We love TypeScript. I’ll get into the reasons why later. And we love virtual reality. Being able to create WebVR experiences has been a focus at Olio Apps this year. This lead us to create a set of tools to help developers to make A-Frame experiences using TypeScript. A-Frame TypeScript Toolkit makes it easy to build standalone components and systems that can be used in other A-Frame projects.
Why TypeScript?
TypeScript is a typed superset of JavaScript that compiles into plain JavaScript and it is our frontend language of choice. For the reasons below, we created a set of tools that would bridge WebVR development and TypeScript.
Development Velocity
First, we’ve found that strict typing help us read and write code faster. The code is self-documenting, indicating what model is expected at every step. This information makes the code more readable and helps the developer understand what each piece of code is doing faster.
Better Code
In addition to writing code faster, TypeScript also helps us write better code. In one way, it forces the developer to consider the structure of data more carefully. The code is more thoughtfully written with deep understanding of data structures and how models are related. Beyond that, TypeScript also finds more errors at compile-time rather than run-time so less problematic code gets pushed to production.
Features and Tooling
Finally, the tooling and features available for TypeScript make the language a valued member of our development stack. A major benefit is that it comes with full ECMAScript 6 feature support. Because the TypeScript we write is compiled to JavaScript readable by our target browser, we are able to take advantage of the newest JavaScript language features.
Additionally, a great tool that TypeScript affords is Visual Studio Code TypeScript Intellisense which offers code completion, hinting, and type definitions that significantly improve the development process.
Why A-Frame?
A-Frame is a web virtual reality framework. We chose A-Frame because it is a powerful open-source framework with great documentation, a supportive community, and excellent learning material. A-Frame is good for beginners to VR development but can also be scaled to make larger VR (and MR) applications. If you are new to VR development, I highly recommend reviewing the documentation.
A-Frame TypeScript Toolkit Overview
The toolkit we have created at Olio Apps combines the power of TypeScript with the accessibility of A-Frame making it easy to develop WebVR.
Base Classes
At its core, the toolkit provides wrapper classes creatively named ComponentWrapper and SystemWrapper which allow you to create strictly typed A-Frame components and systems. These base classes contain all the A-Frame lifecycle methods that can be overridden to suit your desired behavior when you extend the class to create your own custom component or system class.
CLI
The toolkit also contains a CLI which, when globally installed and initiated, makes getting started a breeze. Currently, the CLI supports creating standalone components and systems that can be exported to npm and shared in other A-Frame projects. I’ll discuss more details on using the CLI in the Quick Start Guide section.
Release Support
Equally important to creating VR experiences and Apps is creating assets that can be shared across A-Frame projects. The toolkit contains boilerplate code and instructions to help compile your TypeScript components, systems, and entities into A-Frame code that can be exposed via a CDN and used in A-Frame HTML the traditional way. Because the TypeScript gets compiled into JavaScript, consumers of your TypeScript A-Frame component don't need to use TypeScript in order to use your component.
Quick Start Guide
The fastest way to get started making custom systems and components using the toolkit is through the CLI. The starter code generated by the CLI not only includes starter code for components or systems (your choice) but also includes build commands and webpack configurations to expedite the development process. Complete the following steps to get started developing WebVR with TypeScript.
1. Global Installation
Globally installing the toolkit will allow you to use the CLI to generate a VR project from anywhere on your computer.
yarn global add aframe-typescript-toolkit (or npm install -g aframe-typescript-toolkit)
2. Initiate Project with CLI
Using the command line, navigate to the directory where you would like to add your new A-Frame TypeScript project.
Run the command to initialize the toolkit: aframe-typescript-toolkit

You will be prompted to select from Component or System. Choose Component for starters.
Enter your project's name (this will be the name of the new directory). Use new-component for now.
3. Install & Serve
Navigate into your new project directory: cd new-component
Install dependencies: yarn install
Build the project: yarn build
And start the server to see the boilerplate component in action (http://localhost:3000/) : yarn server
4. Customize
The project generated by the CLI comes with a README that includes tips on customizing the component (or system) and can point you to resources to help the process. While the server is running, changes made to the files in the /src directory are served hot to help you test and debug your creation.
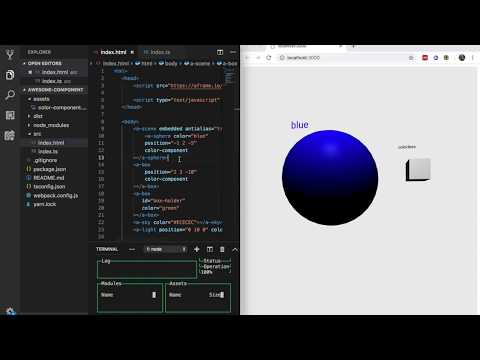
Click the video below to see how you can edit the program in Visual Studio Code and watch your changes be dynamically applied in the browser:
5. Share
Sharing your new custom component is easy. Run yarn build to create CDN or npm publishable artifacts in the dist folder.
A-Frame TypeScript Redux
Another thing we love, beyond TypeScript and WebVR is Redux. Which lead us to use this A-Frame TypeScript Toolkit to create redux-store aware systems and components. This library is called aframe-typescript-redux and it is an excellent example of using the toolkit to create A-Frame artifacts that can be shared. See our previous post and read the documentation to learn more.
Conclusion
Creating custom components and systems are a great way to start contributing to the WebVR community. If you are familiar with TypeScript (or eager to learn it) and excited about WebVR development, give the toolkit a try. We would love to hear your feedback and see the projects you create.